

Tessa’s Recipe Rundown
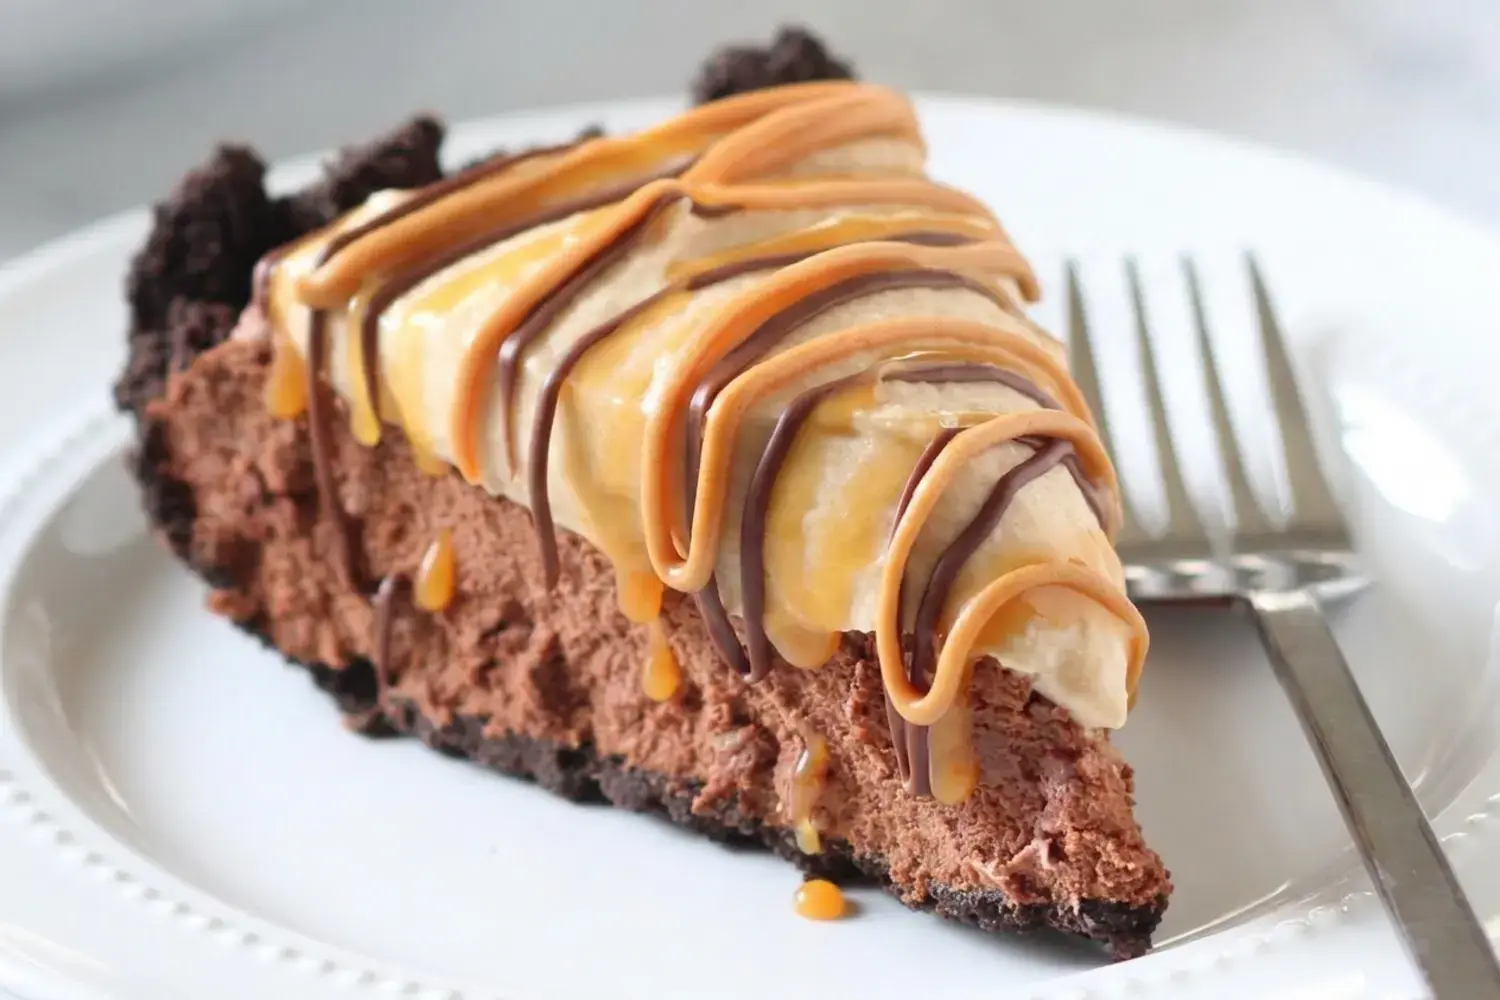
This pie is seriously loaded with all the best flavors, yet it comes together without any fancy pastry skills. Tessa Arias of Handle the Heat built it from three simple layers, an Oreo cookie crust, a chocolate caramel mousse filling, and a peanut butter whipped cream topping, and the finished pie tastes like something from a bakery case.
Decadent is the word that fits best. The mousse is light and airy on the fork but rich and creamy in the mouth, because melted semisweet chocolate is folded gently into whipped cream that has been beaten with caramel. Nothing about it is heavy or dense, and that contrast is the reason people go back for a second slice.

It is also surprisingly easy. The one tool that truly matters is an electric mixer, since both the filling and the topping depend on whipping cream to the right stage. Beyond that, there is no pastry to roll, no dough to chill, and no complicated decorating to worry about.
Tessa first published this recipe in 2015, when it served as her family’s Thanksgiving dessert and not one slice was left. That origin explains the practical choices in the recipe. The crust is a pressed Oreo base rather than a pastry shell.
The caramel can be homemade or store bought, whichever suits your schedule. The peanut butter whipped cream comes together quickly once the cream begins to thicken.

The pie suits more occasions than Thanksgiving. Friendsgiving, a Christmas dessert table, or an office potluck all work well, and its make ahead nature helps a great deal. The mousse needs at least 6 hours in the refrigerator, so building the pie the day before is genuinely the easiest path.
My own habit is to assemble it on a Saturday morning and serve it Sunday evening. There is something satisfying about pulling a finished pie from the refrigerator right when guests arrive, with nothing left to do but drizzle, slice, and take the credit.
Jump to:
- Tessa’s Recipe Rundown
- How to Make Chocolate Peanut Butter Caramel Mousse Pie
- What Kind of Peanut Butter Should I Use in This Pie?
- Do I Have to Make Caramel From Scratch?
- How Much Caramel, Melted Chocolate, and Peanut Butter for Topping?
- Can’t Have Peanuts? Use Almond Butter Instead!
- Which Pie Pan Should I Use for This Pie?
- Can I Freeze Mousse Pie?
- Ingredients
- Instructions
- Notes
- Recipe details
- FAQs
- Can you freeze chocolate mousse pie?
- What kind of peanut butter is best for the mousse pie topping?
- How long does the mousse pie need to chill?
- Can I make this pie ahead of time?
- Chocolate Peanut Butter Caramel Mousse Pie
- Ingredients
- Instructions
- Last Step:
- Did you make this recipe?
How to Make Chocolate Peanut Butter Caramel Mousse Pie
The pie comes together in three stages: the crust, the mousse filling, and the peanut butter whipped cream. Two of those stages call for an electric mixer, and the mousse needs a long chill, so plan for a day ahead. The answers below cover the details that matter most before you start measuring.
What Kind of Peanut Butter Should I Use in This Pie?
Use a conventional creamy peanut butter, the kind with added oil that keeps it stable, such as Skippy or Jif.
Natural peanut butter without that stabilizing oil can make the filling turn oily and separated, which shows up as a greasy texture and a pie that weeps.
If natural peanut butter is all you have, stir it extremely well until it is completely smooth before measuring, and expect a slightly looser result. Smooth texture matters more here than brand loyalty.
Do I Have to Make Caramel From Scratch?
No, you do not. Making caramel at home is encouraged because it is very easy, and a simple homemade caramel sauce lets you control the salt and the depth of flavor.
Store bought caramel is perfectly fine when time is short, and Trader Joe’s Salted Caramel Sauce is named as a favorite. Either way, you need 1/2 cup for the filling, plus a little extra for drizzling at the end.
How Much Caramel, Melted Chocolate, and Peanut Butter for Topping?
That part is left to personal taste. Melt the peanut butter and the chocolate in the microwave, let them cool slightly so they do not melt the whipped cream, then drizzle as much or as little of each as you like over the chilled pie.

Additional caramel sauce goes on at the same time. Just before serving is the right moment, because fresh drizzles look best.
Can’t Have Peanuts? Use Almond Butter Instead!
Tessa has not personally tested this swap in this pie, but she suggests that the peanut butter could likely be replaced with the same amount of almond butter.
Finish the pie the same way, with a drizzle of caramel sauce, melted chocolate, and melted almond butter. The same one to one substitution is said to work well in her Peanut Butter Pie and Peanut Butter Cookies recipes.
Which Pie Pan Should I Use for This Pie?
Tessa used a favorite Emile Henry ceramic pie dish, though any 9 inch pie pan should work. Glass, metal, and ceramic all hold the crust and the mousse the same way. If you want to compare styles in more detail, the site has a separate guide on the different types of pie pans and which is best.
Can I Freeze Mousse Pie?
Yes, this mousse pie freezes well. Freeze it before the whipped cream and any toppings go on. Keep it in an airtight container for up to one month.
Thaw it overnight in the refrigerator, then add the peanut butter whipped cream and the drizzles before serving. Freezing and thawing may slightly alter the texture, but the pie will still be delicious, and knowing there is one waiting in the freezer is a nice comfort before the holidays.
Ingredients
Everything below makes one 9 inch pie. Regular stuffed Oreos are the right choice for the crust, so leave the filling intact rather than scraping it out.
For the crust
- 20 Oreo cookies, regular stuffed, filling intact
- 3 tablespoons unsalted butter, melted
For the filling
- 8 ounces semisweet chocolate, chopped
- 1 cup heavy cream
- 1/2 cup homemade salted caramel sauce or store bought
For the peanut butter whipped cream
- 1 1/2 cups heavy cream
- 1/2 cup smooth peanut butter
- 2 tablespoons confectioners’ sugar
- 1 teaspoon vanilla extract
For drizzling, optional
- Additional caramel sauce
- Additional peanut butter, melted
- Additional semisweet chocolate, melted
Instructions
Make the crust
- Preheat the oven to 350°F. Spray a 9 inch pie dish with cooking spray.
- Place the Oreo cookies in the bowl of a food processor and pulse until finely ground. Add the melted butter and pulse until the crumbs are moistened. Press the mixture into the bottom and up the sides of the prepared pie dish. Bake for 10 minutes, or until fragrant and set. Let it cool completely on a wire rack.
Make the filling
- In a microwave safe bowl, heat the chocolate on high in 30 second intervals, stirring between each interval, until melted and smooth. Let it cool.
- In a large bowl, use an electric mixer fitted with the whisk attachment to beat 1 cup of the cream until soft peaks form. On medium speed, gradually add 1/2 cup of the caramel and continue whipping until medium stiff peaks form. Gently fold in the cooled melted chocolate until combined. Pour the filling into the cookie crust and cover with plastic wrap. Refrigerate for at least 6 hours.
Make the topping
- In a large bowl, use an electric mixer fitted with the whisk attachment to beat 1 1/2 cups of the cream until thickened. Add the peanut butter, sugar, and vanilla, then beat on high speed until soft peaks form. Be careful not to overbeat, or the cream will turn grainy.
- Spread the cream evenly over the mousse layer. At this point you can refrigerate the pie overnight if you like.
- Just before serving, drizzle with as much caramel sauce, melted chocolate, and melted peanut butter as you desire.
If you want a tidy slice, run a thin knife under hot water, dry it, and wipe it clean between cuts. The mousse is soft, so a warm blade makes a visible difference on the plate.
Give the mousse its full 6 hours. Rushing the chill is the one shortcut that shows up in the final texture.
Notes
The pie can be frozen before the whipped cream and toppings are added, which makes it a practical dessert to prepare in advance.
Freeze it in an airtight container for up to one month, then thaw overnight in the refrigerator before adding the whipped cream and the drizzles. Freezing and thawing may slightly alter the texture, but the pie will still taste wonderful.
If you are planning ahead for a holiday, assemble the pie through the mousse layer a day in advance. The whipped cream takes only a few minutes, so spreading it on the day you serve keeps the top looking fresh, and the drizzles go on last, right before the pie reaches the table.
Recipe details
One recipe makes a single 9 inch pie, and the numbers below reflect the work before the long chill.
| Detail | Value |
|---|---|
| Yield | 1 9 inch pie |
| Prep time | 25 minutes |
| Cook time | 10 minutes |
| Total time | 35 minutes |
The total does not include the 6 hours of chilling that the mousse needs, so give yourself a full day from start to serving.
FAQs
Can you freeze chocolate mousse pie?
Yes, you can freeze this pie before adding the peanut butter whipped cream and toppings. Freeze it in an airtight container for up to one month, then thaw overnight in the refrigerator before adding the whipped cream and toppings and serving. Freezing a fully assembled pie is not recommended, as the whipped cream can become watery upon thawing.
What kind of peanut butter is best for the mousse pie topping?
Conventional creamy peanut butter like Skippy or Jif is recommended because these brands contain stabilizers that prevent the oils from separating during whipping. Natural peanut butter without added stabilizing oil may cause the filling to become oily and separated; if you must use it, stir it extremely well until smooth.
How long does the mousse pie need to chill?
The filled pie needs to be refrigerated for at least 6 hours to set properly. For the cleanest slices and best texture, chilling it overnight is even better. Once set, the pie can be refrigerated for up to two days, though the texture and appearance are best on the first day.
Can I make this pie ahead of time?
Yes, this pie is ideal for making ahead. The mousse layer can be prepared and chilled a day in advance, with the peanut butter whipped cream added on the day of serving. If you want to store it longer without the topping, freeze the mousse-filled crust for up to one month, then thaw and add the topping when ready to serve.

Chocolate Peanut Butter Caramel Mousse Pie
Tessa’s Recipe Rundown This pie is seriously loaded with all the best flavors, yet it comes together without any fancy pastry skills. Tessa Arias of Handle the Heat built it from three simple layers, an Oreo cookie crust, a chocolate caramel mousse filling, and a peanut butter whipped cream topping, and the finished pie tastes like something from a bakery case.
- Total Time: 35 min
- Yield: 1 9-inch pie 1x
Ingredients
For the crust
20 Oreo cookies (regular-stuffed, filling intact) Oreo cookies
3 tablespoons unsalted butter, melted
For the filling
8 ounces semisweet chocolate, chopped
1 cup heavy cream
1/2 cup homemade salted caramel sauce or store-bought
For the peanut butter whipped cream
1 1/2 cups heavy cream
1/2 cup smooth peanut butter
2 tablespoons confectioners’ sugar
1 teaspoon vanilla extract
caramel sauce, for drizzling
peanut butter, melted, for drizzling
semisweet chocolate, melted, for drizzling
Instructions
Make the crust
1-Preheat the oven to 350°F: Preheat the oven to 350°F. Spray a 9-inch pie dish with cooking spray.
2-Place the Oreo cookies in the bowl: Place the Oreo cookies in the bowl of a food processor and pulse until finely ground. Add in the melted butter and pulse until moistened. Press the mixture into the bottom and up the sides of the prepared pie dish. Bake for 10 minutes, or until fragrant and set. Let cool completely on a wire rack.
Make the filling
3-In a microwave-safe bowl, heat the chocolate: In a microwave-safe bowl, heat the chocolate on high in 30-second intervals, stirring between each interval, until melted and smooth. Let cool.
4-In a large bowl, use an electric: In a large bowl, use an electric mixer fitted with the whisk attachment to beat the cream until soft peaks form. On medium speed, gradually add the caramel and continue whipping until medium-stiff peaks form. Gently fold in the cooled melted chocolate until combined. Pour into cookie crust and cover with plastic wrap. Refrigerate for at least 6 hours.
Make the topping
5-In a large bowl, use an electric: In a large bowl, use an electric mixer fitted with the whisk attachment to beat the cream until thickened. Add the peanut butter, sugar, and vanilla and beat on high speed until soft peaks form. Be careful not to overbeat.
6-Spread the cream evenly over the mousse: Spread the cream evenly over the mousse layer. At this point you can refrigerate overnight if desired.
7-Just before serving, drizzle with as much: Just before serving, drizzle with as much caramel sauce, melted chocolate, and melted peanut butter as desired.
Last Step:
Please leave a rating and comment letting us know how you liked this recipe! This helps our business to thrive and continue providing free, high-quality recipes for you.- Prep Time: 25 min
- Cook Time: 10 min
- Method: bake


