

Why You’ll Love This Fluffernutter Pie
Fluffernutter Pie is a nostalgic, no-bake dessert that brings together soft marshmallow filling and creamy peanut butter in a crunchy graham cracker crust. It’s perfect for busy home cooks, parents, students, and anyone who wants a show-stopping dessert without turning on the oven. Read on to see why this recipe quickly becomes a favorite.
- Ease of preparation: This no-bake Fluffernutter Pie comes together in about 15 minutes of hands-on work plus chilling time. No oven or special equipment needed, which makes it great for apartments, dorms, or hot days.
- Health benefits: While indulgent, you can control portion sizes and ingredient choices. The recipe uses whole milk and heavy cream for a rich texture; lighter substitutions are possible for calorie savings.
- Versatility: The base recipe adapts well to dietary swaps and portion systems. Make it in a 9-inch pie pan or as individual servings in ramekins or muffin tins for parties or meal prep.
- Distinctive flavor: The sweet marshmallow filling and salty peanut butter topping create a classic sweet-salty contrast that tastes like a grown-up version of the fluffernutter sandwich.
Want more no-bake ideas? Try a peach cobbler-style no-bake treat like this peach cobbler dump cake for an easy, fruity alternative.
Jump to:
- Why You’ll Love This Fluffernutter Pie
- Essential Ingredients for Fluffernutter Pie
- Ingredients
- Special Dietary Options
- How to Prepare the Perfect Fluffernutter Pie: Step-by-Step Guide
- Preparation and mise en place
- Melting and cooling the marshmallow base
- Whipping and folding
- Building the crust
- Assembling the pie
- Chilling and serving
- Dietary Substitutions to Customize Your Fluffernutter Pie
- Protein and Main Component Alternatives
- Vegetable, Sauce, and Seasoning Modifications
- Mastering Fluffernutter Pie: Advanced Tips and Variations
- Pro cooking techniques
- Flavor variations
- Presentation tips
- Make-ahead options
- How to Store Fluffernutter Pie: Best Practices
- Refrigeration
- Freezing
- Reheating
- Meal prep considerations
- FAQs: Frequently Asked Questions About Fluffernutter Pie
- What is Fluffernutter Pie?
- What ingredients are in Fluffernutter Pie?
- Can I make Fluffernutter Pie in individual portions?
- How do you store Fluffernutter Pie?
- Can you freeze Fluffernutter Pie?
- Fluffernutter Pie
- Ingredients
- Instructions
- Last Step:
- Notes
- Nutrition
- Did you make this recipe?
Essential Ingredients for Fluffernutter Pie
Below is a clear, structured list of every ingredient used in this Fluffernutter Pie recipe. Each line shows the precise measurement first, making it simple to shop and prep.
Ingredients
- 3 cups mini marshmallows (or about 24 regular-sized marshmallows) – for the soft marshmallow filling that sets when cooled
- 1/2 cup whole milk – helps melt the marshmallows into a smooth custard; whole milk gives best creaminess
- 1 1/2 cups heavy cream – whipped to soft peaks to create the light, airy texture of the filling
- 1 1/2 cups graham cracker crumbs (about 10-12 sheets) – forms the crunchy, buttery crust base
- 1/2 cup melted butter – binds the graham crumbs and helps the crust set firmly
- 1/2 cup creamy peanut butter, melted – the sweet, nutty topping that finishes the pie
Special Dietary Options
- Vegan: Swap mini marshmallows for vegan marshmallows, whole milk for unsweetened soy or oat milk, heavy cream for coconut whipped cream (chill full-fat coconut milk and use the solid cream), melted butter for a vegan butter or coconut oil, and use a plant-based peanut butter.
- Gluten-free: Use gluten-free graham cracker crumbs or crushed gluten-free cookies in place of graham crackers.
- Low-calorie: Try reduced-fat milk, a light whipped topping alternative, and use reduced-fat or powdered peanut butter thinned with a little water for the topping.
How to Prepare the Perfect Fluffernutter Pie: Step-by-Step Guide
This step-by-step section walks you through the full method for making Fluffernutter Pie exactly as written. Follow the timing notes to get a stable, fluffy filling and a crisp crust.
Preparation and mise en place
First Step: Gather and measure all ingredients. Line a 9-inch pie pan so the crust presses in evenly. If using regular-sized marshmallows, count out about 24 to equal 3 cups of mini marshmallows. Chill the heavy cream so it whips more reliably.
Melting and cooling the marshmallow base
Second Step: Combine 3 cups mini marshmallows and 1/2 cup whole milk in a small saucepan. Melt over low heat, stirring constantly until the marshmallows are completely smooth and uniform with the milk. Remove from heat and let cool for 30 minutes. Cooling prevents the hot mash from deflating the whipped cream later.
Whipping and folding
Third Step: While the marshmallow mixture cools, pour 1 1/2 cups heavy cream into a chilled mixing bowl and whip to soft peaks. Soft peaks should hold shape briefly but still gently fold over when you lift the beater.
Fourth Step: Gently fold the cooled marshmallow mixture into the whipped cream using a rubber spatula. Fold in thirds to keep the mixture airy: add one third, fold until almost incorporated, repeat, then add the final third and fold until uniform. Avoid overmixing to keep the filling light.
Building the crust
Fifth Step: In a medium bowl, mix 1 1/2 cups graham cracker crumbs with 1/2 cup melted butter until crumbs are fully coated. Press the crumb mixture firmly into the bottom and up the sides of a 9-inch pie pan to form an even crust. Press with the back of a measuring cup for an even surface. A firm press helps the crust hold together when slicing.
Assembling the pie
Sixth Step: Spread the marshmallow and cream filling evenly into the graham cracker crust using a spatula. Smooth the top for a neat finish. Melt 1/2 cup creamy peanut butter gently (low heat or microwave in short bursts and stir) and either drizzle or spread over the top of the pie. For a glossy finish, apply with a warm offset spatula. For swirls, drizzle and use a toothpick to make designs.
Chilling and serving
Final Step: Chill the assembled pie in the refrigerator for at least 2 hours or overnight until set. This helps the filling firm and the crust set. Slice into 8-10 pieces. Serve chilled with optional whipped cream, crushed peanuts, or a dusting of cocoa powder.
| Task | Time |
|---|---|
| Hands-on prep | 15 minutes |
| Marshmallow cooling | 30 minutes |
| Chill to set | 2 hours or overnight |
| Total | ~2 hours 15 minutes |
Tip: Melt the peanut butter gently and stir frequently to avoid scorching. For a prettier top, let the peanut butter cool slightly before spreading so it holds swirls.

Dietary Substitutions to Customize Your Fluffernutter Pie
This section offers easy swaps so the Fluffernutter Pie works for vegan, gluten-free, lower-calorie, or nut-free needs. Choose the option that matches your pantry and preferences.
Protein and Main Component Alternatives
Heavy cream and whole milk are central to the creamy texture in this recipe. If you need dairy-free options, full-fat coconut milk or a stabilized coconut whipped cream are the best substitutes to keep body and texture. For a lighter profile, try reduced-fat whipping cream or a commercial light whipped topping, but texture will be slightly softer.
- Dairy-free: Replace 1 1/2 cups heavy cream with chilled coconut cream whipped to soft peaks. Replace 1/2 cup whole milk with unsweetened soy or oat milk.
- Nut-free: Skip the peanut butter topping and use sunflower seed butter or a chocolate drizzle instead. Sunflower seed butter offers a similar texture and nutty flavor without tree nut allergens.
- Lower calorie: Use powdered peanut butter reconstituted with water for the topping and swap heavy cream for a whipped topping product labeled light.
Vegetable, Sauce, and Seasoning Modifications
This pie is mainly sweet, so seasoning changes are limited but effective. A pinch of fine sea salt in the peanut butter can highlight contrast, and a splash of vanilla extract in the marshmallow-milk mixture can deepen flavor.
- Add a sprinkle of flaky sea salt on top of the peanut butter for a salted-sweet finish.
- Mix a tablespoon of cocoa powder into the graham crumbs for a chocolate crust.
- Substitute chocolate marshmallows or add a chocolate layer for a s’mores-style pie.
Mastering Fluffernutter Pie: Advanced Tips and Variations
Once you have the basic Fluffernutter Pie down, experiment with texture and presentation. These tips help you get clean slices, balance flavors, and adapt the recipe for events.
Pro cooking techniques
- Cool the marshmallow mixture fully before folding to avoid deflating the whipped cream and to keep the filling airy.
- Press the crust firmly and chill the pie for a longer time if you plan to slice thin pieces for serving at parties.
- For very clean slices, chill the pie overnight and run a sharp knife under hot water, wipe dry, then slice in a single smooth motion.
Flavor variations
- S’mores version: Add a layer of melted chocolate chips between crust and filling or use chocolate marshmallows for the filling.
- Crunch boost: Use crunchy peanut butter or sprinkle chopped peanuts on top before chilling.
- Mini pies: Make individual portions in ramekins or muffin tins for easier serving and portable desserts.
Presentation tips
Garnish with a light dusting of cocoa powder, a few mini marshmallows, and a drizzle of additional melted peanut butter. Use an offset spatula for a smooth finish or a piping bag for pretty swirls if you make a whipped peanut butter topping.
Make-ahead options
Assemble the pie up to 24 hours ahead. Store covered in the refrigerator. If you need to make it further ahead, freeze slices as described in the storage section below and add peanut butter drizzle after thawing.
External resources on no-bake pies and inspiration can be helpful; check a classic round-up here: + $(‘AI Agent’).item.json.output.Anchor2 + for more no-bake pie ideas.
How to Store Fluffernutter Pie: Best Practices
Proper storage keeps the pie tasting fresh and keeps textures stable. Below are short-term and long-term storage approaches along with meal prep notes.
Refrigeration
Cover the pie tightly with plastic wrap or place in an airtight container and refrigerate. It stays fresh for 3-4 days. Avoid leaving slices at room temperature longer than 2 hours.
Freezing
For longer storage, freeze individual slices on a parchment-lined tray for 2 hours, then transfer to freezer bags or airtight containers. The pie keeps up to 2 months. Thaw in the fridge for 4-6 hours or overnight before serving. Add fresh toppings after thawing for best texture.
Reheating
Because this is a chilled dessert, reheating is not necessary. If you prefer a slightly softer filling after thawing, microwave a single slice for 5-10 seconds, but expect minor texture changes.
Meal prep considerations
Make individual portions in ramekins or muffin tins for grab-and-go desserts. Store covered in the fridge for up to 3-4 days. Flash-freeze if you want to pull single servings later.

FAQs: Frequently Asked Questions About Fluffernutter Pie
What is Fluffernutter Pie?
Fluffernutter Pie is a creamy, no-bake dessert inspired by the classic fluffernutter sandwich, which combines peanut butter and marshmallow fluff on white bread. This pie features a graham cracker crust filled with a fluffy mixture of marshmallow creme, cream cheese, and whipped topping, then topped with smooth peanut butter or a chocolate-peanut butter ganache. It’s sweet, salty, and nostalgic, perfect for potlucks or summer gatherings. Prep time is about 20 minutes plus chilling for 4 hours. Serve chilled with whipped cream and crushed peanuts for extra crunch. No oven required—simply mix, assemble, and refrigerate until set. This crowd-pleasing treat captures the gooey joy of the original sandwich in pie form. (87 words)
What ingredients are in Fluffernutter Pie?
Key ingredients for Fluffernutter Pie include: For the crust—1 1/2 cups graham cracker crumbs, 1/3 cup melted butter, and 1/4 cup sugar. Filling: 8 oz softened cream cheese, 7 oz marshmallow fluff, 1 cup powdered sugar, and 8 oz whipped topping (thawed). Topping: 1/2 cup peanut butter (smooth or crunchy), melted chocolate chips (optional), and peanuts for garnish. Use full-fat ingredients for best texture. Substitute almond butter for nut-free versions or dairy-free alternatives like coconut whipped cream. Measure precisely for a stable set. All common pantry staples make it easy to whip up. (92 words)
Can I make Fluffernutter Pie in individual portions?
Yes, Fluffernutter Pie works great in individual portions using 4-6 oz ramekins, mini pie tins, muffin tins lined with paper cups, or small bowls. Prepare the crust by mixing crumbs, butter, and sugar, then press 2-3 tablespoons into each container. Divide filling evenly (about 1/4 cup per ramekin), top with 1-2 tablespoons melted peanut butter, and chill 2-4 hours. This yields 8-12 servings. It’s ideal for parties—guests get their own pie without slicing mess. Ensure containers are oven-safe if baking crust briefly, but no-bake works fine. Garnish just before serving. (94 words)
How do you store Fluffernutter Pie?
Store Fluffernutter Pie covered tightly with plastic wrap or in an airtight container in the refrigerator. It stays fresh for 3-4 days due to dairy and marshmallow ingredients. For best texture, avoid room temperature longer than 2 hours to prevent softening. To freeze, wrap individual slices in plastic and foil; it keeps up to 2 months. Thaw overnight in the fridge before serving—microwave briefly if needed, but expect some texture change. Label with dates for safety. Don’t leave out overnight, as it can spoil quickly in warm conditions. Always check for off smells before eating. (89 words)
Can you freeze Fluffernutter Pie?
Yes, you can freeze Fluffernutter Pie for up to 2 months. Slice into portions, place on a parchment-lined tray to flash-freeze for 2 hours, then transfer to freezer bags or airtight containers to prevent sticking. The marshmallow fluff holds up well, but whipped topping may soften slightly upon thawing. Thaw in the fridge for 4-6 hours or overnight. For best results, add toppings like chocolate drizzle after thawing. Avoid refreezing thawed pie. This makes it great for make-ahead desserts—pull out for last-minute treats without losing much creaminess. (85 words)
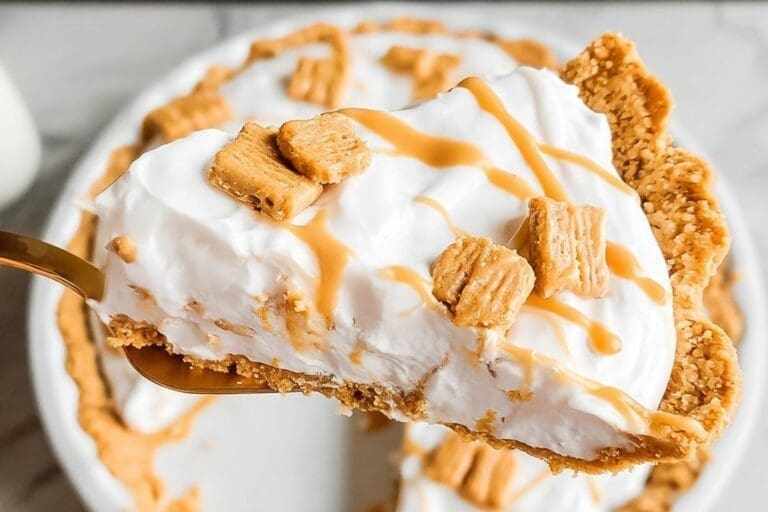
Fluffernutter Pie
🥜 Experience the perfect marriage of creamy peanut butter and fluffy marshmallow in this decadent no-bake pie
🍪 Transform the classic fluffernutter sandwich into an elegant dessert that’s sure to impress your family and friends
- Total Time: 2 hours 15 minutes
- Yield: 8 servings
Ingredients
– 3 cups mini marshmallows for the soft marshmallow filling that sets when cooled
– 1/2 cup whole milk helps melt the marshmallows into a smooth custard; whole milk gives best creaminess
– 1 1/2 cups heavy cream whipped to soft peaks to create the light, airy texture of the filling
– 1 1/2 cups graham cracker crumbs forms the crunchy, buttery crust base
– 1/2 cup melted butter binds the graham crumbs and helps the crust set firmly
– 1/2 cup creamy peanut butter, melted the sweet, nutty topping that finishes the pie
Instructions
1-First Step: Gather and measure all ingredients. Line a 9-inch pie pan so the crust presses in evenly. If using regular-sized marshmallows, count out about 24 to equal 3 cups of mini marshmallows. Chill the heavy cream so it whips more reliably.
2-Second Step: Combine 3 cups mini marshmallows and 1/2 cup whole milk in a small saucepan. Melt over low heat, stirring constantly until the marshmallows are completely smooth and uniform with the milk. Remove from heat and let cool for 30 minutes. Cooling prevents the hot mash from deflating the whipped cream later.
3-Third Step: While the marshmallow mixture cools, pour 1 1/2 cups heavy cream into a chilled mixing bowl and whip to soft peaks. Soft peaks should hold shape briefly but still gently fold over when you lift the beater.
4-Fourth Step: Gently fold the cooled marshmallow mixture into the whipped cream using a rubber spatula. Fold in thirds to keep the mixture airy: add one third, fold until almost incorporated, repeat, then add the final third and fold until uniform. Avoid overmixing to keep the filling light.
5-Fifth Step: In a medium bowl, mix 1 1/2 cups graham cracker crumbs with 1/2 cup melted butter until crumbs are fully coated. Press the crumb mixture firmly into the bottom and up the sides of a 9-inch pie pan to form an even crust. Press with the back of a measuring cup for an even surface. A firm press helps the crust hold together when slicing.
6-Sixth Step: Spread the marshmallow and cream filling evenly into the graham cracker crust using a spatula. Smooth the top for a neat finish. Melt 1/2 cup creamy peanut butter gently (low heat or microwave in short bursts and stir) and either drizzle or spread over the top of the pie. For a glossy finish, apply with a warm offset spatula. For swirls, drizzle and use a toothpick to make designs.
7-Final Step: Chill the assembled pie in the refrigerator for at least 2 hours or overnight until set. This helps the filling firm and the crust set. Slice into 8-10 pieces. Serve chilled with optional whipped cream, crushed peanuts, or a dusting of cocoa powder.
Last Step:
Please leave a rating and comment letting us know how you liked this recipe! This helps our business to thrive and continue providing free, high-quality recipes for you.Notes
🥛 Use whole milk for the creamiest filling – 2% milk works but will be less creamy
🥄 Opt for creamy peanut butter for smoothness, or crunchy peanut butter for added texture
🍽️ Make individual portions in ramekins, small pie tins, or muffin tins for perfect single servings
- Prep Time: 15 minutes
- Chilling Time: 2 hours
- Cook Time: 0 minutes
- Category: Dessert
- Method: No-bake
- Cuisine: American
- Diet: Vegetarian
Nutrition
- Serving Size: 1 slice
- Calories: 485
- Sugar: 30g
- Sodium: 250mg
- Fat: 28g
- Saturated Fat: 15g
- Unsaturated Fat: 13g
- Trans Fat: 0g
- Carbohydrates: 45g
- Fiber: 2g
- Protein: 8g
- Cholesterol: 60mg


